
This chapter in the book discusses the various aspects of metal like which to enamel on, how to prepare the surface to enamel, etching, wire work and more. Below is some extra information.
Table of Contents
- Copper Blanks and Cutouts
- Mesh
- Etching
- Free Etch Book
- Using PhotoShop to Adjust Images
- PnP Paper
- Other Resists
- Ferric Chloride Bath
- Adhering PnP Paper to Metal - using a Laminator or Other Devices
- Flashing Fine Silver
- Pin Setting - solderless
- Steel Blackboard and Whiteboard
- Warpage
 Copper Blanks
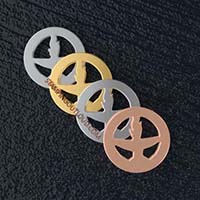
Many companies sell copper sheet or blanks (cutouts). Although already listed in my Resources list, this company is really terrific to work with. The company is Stamping Out Loud and they sell their designs in 4 different metals (copper, aluminum, brass and nickle) while giving you the options to include holes or not and your gauge metal. And when they are selling a rectangle, it is a true rectangle, unlike others who are not as careful with their cuts. In addition, their edges are finished so the piece looks smooth all around. As you can tell, I cannot say enough about them.
They do sell Artist Trading Card size copper - that's 2.5" x 3.5".
Stamping Out Loud is being very kind to us and making a discount code available for one time use per person. The code is: kcenamel10
I've always worked with one of the owners, Wendy, who is very commodating. This company will stamp out custom designs in a few different ways - exclusive or for sales to others. The choice is yours. For example, this was a custom design, a Unitarian Chalice, that they have for sale to anyone who wants it. So for all of you artists who want your copper cut to your specs, here's the chance to get it done right. Contact them for details.
Etching
The book discusses various aspects of etching, including step by step on electro etching. it enourages the reader to read more about other aspects of the etching process. Below are more resources for you to research.
Free Etching Book
In years past, Coral Shaffer, an enamelist, wrote and sold a text on etching that gave all the ins and outs of the process. She is now retired and so graciously allowed me to include her text on my site. Relief Etching for Jewelers And Enamelists, by Coral Shaffer is now copyright free, and can be downloaded from the link provided. Thank you Coral!!! Disclaimer: this was written quite a few years ago so certainly some of the resouces are incorrect and possible some old information is included.
Using Photoshop to Adjust Images
Some people wanting to etch might have problems adjusting an image that can etch well. René Roberts, an enamelist, works with several materials, combining glass, metal, fire and photography to create pieces that are ambiguous and often appear to be visual hybrids. René has created a set of videos on using Photoshop to accomplish turning a photo into an etchable image. These are well worth viewing if you want to accomplish more in Photoshop or use the techniques she discusses in your photo editing software. She recommends the book: "The Contemporary Printmaker: Intaglio-Type & Acrylic Resist Etching" by Keith Howard to learn more about etching and various resists.
Here is her process with sample photos:
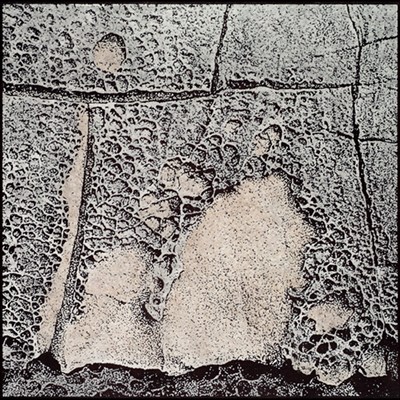
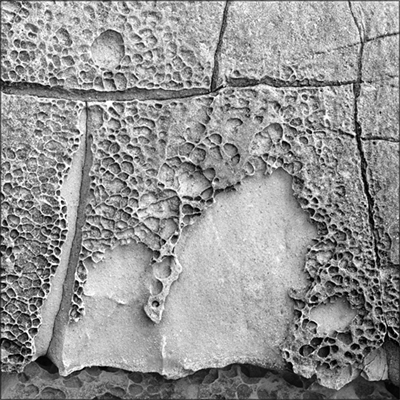
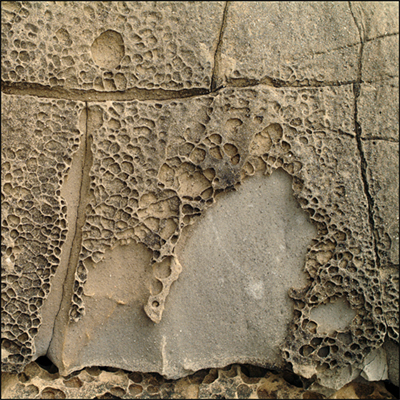
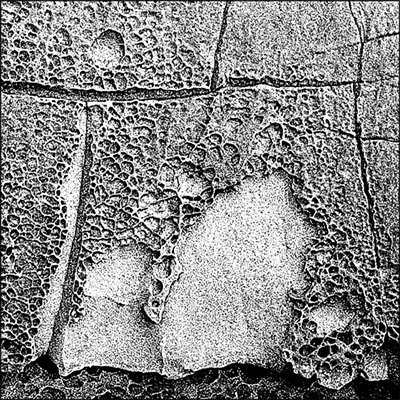
I make champlevé wall panels from landscape photos. They are on the average about 8" x 8". I have to deep-etch a black and white image, but etching is an on or off process that requires only solid blacks and whites. So I create the appearance of "grays" with a very coarse half tone screen that turns everything to black and white squiggles. Some of the dots are as small as half millimeter. I print this halftone image onto acetate that acts as a "negative", and I use this negative to expose the image onto a photopolymer film that I've adhered to the copper. When exposed and developed, the film hardens into a resist for ferric chloride. I etch the pieces for about 3 hours to a depth a little less than a millimeter. I then fill all the recessed areas with a 300 mesh enamel applied like a "mud". I make about three applications, firing between each and stoning between firings. I mix various enamels, leaded and unleaded, according to the color of white I want, and the degree of copper oxidation they exhibit in the tiny recesses. The whites have to be able to hold up for several firings without turning green. With "Salt Point Tafoni No. 2", I wanted the two distinct colors in the rock formation, so I used pale gray enamel for one of the areas. I created the tan contrast in the other area by painting with glass stainer's colors (similar to Mason stains) that I applied after the final enamel firing. Sometimes I fine tune the painted colors for an additional two or three firings. The final piece receives a patina to darken the copper to a brownish black. It's only when I've darkened the copper that the full "3-D appearance" of the piece emerges.
|
 Original Image |
|
|
 Turned into a half toned screen |
|
|
PnP Paper
Marissa Saneholtz is an Assistant Teaching Professor at Bowling Green University in the Metals Department. She has developed a way to use a partial sheet of PnP paper for a resist and has some other new things about etching not described in the book.
This technique is for when you want to print only one image onto PnP paper and not use an entire sheet. This has to be done, as usual, either on a toner copier or a laser printer.
- Place a sheet of plain white bond paper in your device's feeder tray. While in place, put an X in the lower right corner as a registration mark for when the paper goes back into the tray.
- Print your image on the paper. If using a copier, DO NOT move the image as you will want it in the same place when you print again.
- Cut a piece of PnP paper big enough to cover the image with extra on either side for Scotch Tape to hold it down.
- Tape down the cut piece of PnP paper over the printed image, matte side up (that's the print side), on the edges to hold into place. See photo at right - the image of the woman sitting is behind the PnP paper.
- Place back into the device's feeder tray with your registration X in the lower right corner.
- Print the image again and remove PnP from the bond paper.
- Now you are ready to heat set the PnP paper onto your cleaned metal.
- See Ferric Cloride Bath section below for more photos.
Other Resists
- Testor's Enamel Paint, any color, is a great resist for etching and can be used as touch up for PnP designs once they are adhered to your metal. This can be purchased at many art supply stores. Marissa Saneholtz likes Testor's Enamel Paint as it is not as tacky and is thinner than nail polish, and using a fine brush you can get very fine lines.
- If you have a plotter type device, you can use resist liquid (like Asphaltum, possibly thinned with Mineral Oil) to cover an entire piece of cleaned copper and then using the device, scratch off a design in the paint.
- PCB paper - another toner transfer paper (it's yellow instead of blue like PnP paper. This is frequently used by Teresa Kiplinger - see her use of a lamintor below. Teresa does think PCB works best when there’s a fine tooth to the metal, which she achieves nicely using 320 sandpaper and Bar Keepers Friend with water.
- Lamour's Black Satin Varnish - from France.
Ferric CLoride Bath
Here's a great idea for your Ferric Cloride bath, also recomended by Marissa Saneholtz, if you don't have room for a large container and need to etch a few pieces at one time: use soft wax (so that you can mold it with your fingers) balls on each corner of your piece and shift-stack the pieces. This does require that you have a border as the wax will act as a resist. Also note that the pieces nearer the top will etch faster so you will need to re-organize the stack at some point to get an even etch in each.
Adhering PnP Paper to Metal
Using a Lamintor
Teresa Kiplinger found this on John Fetvedt's Electro-etchers Anonymous Facebook group. If you have a laminator that works with this (it's not clear they all do), it really eliminates some issues and there is no burnishing. Teresa uses a Tahsin SM-330 laminator by Tamerica. She says that she can use up to 14 ga metal this way. To do this:
- Print your design onto the PnP or PCB paper in the normal way. Cut to size.
- Teresa likes to clean her metal with 320 sandpaper and Bar Keepers Friend together, especially when using PCB paper as she feels having a slight tooth on the metal helps with this type of transfer. But you can clean the way your normally do.
- Using Scotch Tape, attach the ink side of the image to cleaned metal.
- Then tape both to a long strip of plain bond paper or card stock. The purpose of the bond paper is to ensure the piece is long enough to completely go through the laminator without getting lost in the rollers. If your piece is fairly long, it's okay to cover the entire piece of PNP/PCB with tape to prevent the design from moving around as it runs through the rollers. You will need to experiment with your device.
- Optional: put taped piece into a lamintor pouch, up against the folded end. Teresa doesn't actually use this, and I haven't tried it, but I've seen it used in other situations and it seems like it might hold the materials together if you are insecure about this.
- Set the laminator to the highest setting and run through. As soon as it comes out, run it through again. Grip it by the bond paper, as the metal will be quite hot. Continue to do this until the image is heat set - maybe 3-6 times. But be sure to not wait before running through again so that it does not cool off. Heavier gauge metal and larger pieces tend to need more passes through the heat, while thinner gauge and smaller pieces need fewer passes.
- Remove all tape and you should be set to go.
- Optional: quench in water to quickly cool.
Other devices to use
In the Champlevé project in the book, Kathy Wood uses a high-setitng iron to adhere PnP paper to cleaned metal. This method is done from above the piece. But in addition to the laminator method above, there are other devices that can be used, all heat the metal from below.
Marissa Saneholtz prefers a flat griddle or heating tray, but an upside down iron held by its handle in a vise also works. What Marissa does:
- Get all ready for this step of the process (print your image on PnP and clean your metal).
- She doesn't use burnishers in this process - she uses 2 pieces of crumpled paper towel - the cheaper the towel the better, like from a public rest room. This paper doesn't absorb well (it's cheap!), but it's usually smooth and works great for this process.
- Heat your device. To test if it's hot enough, she throws a few drips of water onto the griddle. If the water immediatley evaporates, it's hot enough. For her griddle, she sets it at 250°F (but an iron should be at cotton setting which is around 400°F). The griddle Marissa uses was inexpensive, so the temperature she sets it to may not be the true temperature. You will have to experiment with your own device. Just remember that if it's too hot, the PnP page will begin to melt and if too cool, the image will not adhere.
- Using a tweezer, postion the image above the metal and use one paper towel to press it down on the opposite corner of the tweezer. Then release the tweezer and use the other paper towel to hold the PnP in place. Work the paper towels around the piece to "burnish" the image onto the metal, being sure to always hold the PnP with one of the paper towels.
- You are done, as always, when the black lines on the PnP seem to be more bold. Being careful to not displace the PnP, use tweezers to pick up your piece and quench it in water. Peel back a corner of your PnP to make sure the image transferred properly. You can reheat it, but mistakes can be fixed with additional resist and a scribe as well.
Mesh
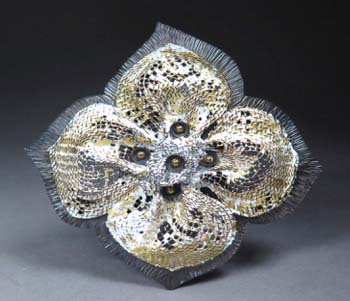
Here's another use for copper mesh... Barbara Minor does a beautiful job of enameling on formed metal, including mesh with liquid enamel and gold foil! In the 2.5" x 2.5" piece below, titled "Screen Floral", she uses liquid enamel on the formed copper screening with 24 kt gold foil and includes fabricated sterling silver, brass and glass; photo credit: Ralph Gabriner. She teaches this and many other techniques - Barbara's class schedule can be viewed on-line.
Steel - Blackboard and Whiteboard
Steel is a valid enamemling surface and used in the Steel Based Enameling project. Two types of steel, Blackboard and Whiteboard, not mentioned in the book, are now listed in the Steel Based Enameling project. These are rather cool as they are the same material used in classrooms for teachers to write on!
Flashing Fine Silver
Page 64 in the book has an LTT on Flashing Fine Silver - in order to get a shinnier surface for transparents. The instructions to do this are provided. And Merry-Lee Rae has a free video on making The Perfect Blank in which she demonstrates how to do this. She said she learned it from Ricky Frank, who is another wonderful enamelist to take classes from.
Warpage
Warpage of the metal during enameling can clearly a problem and is discussed in the book on page 65-66. There are a few ways to inhibit getting warpage as Judy Stone does in her project on page 252 (she uses a "bed of nails" trivet to support the center of the piece from underneath). Other trivets to use are two saw-tooth trivets. But here is more...
Kathleen Wilcox lays her pieces just on the firing rack to keep her flat piece flat! Here is what she says:
I deal with warping in the same way others do. I use antique smooth surface flat irons to flatten enamel pieces immediately when the piece comes out of the kiln. Using heavier gauge copper helps with controlling warping of larger flat pieces. Forming and slight domes will help with warping.
Also, the way the piece is supported may help. With larger flat pieces, I like to fire it flat on the rack for more support. Off course, the counter enamel will then stick to the rack. Many enamelist lay the pieces on various types of glass fiber/fabric sheets or mica sitting on the rack to keep the counter enamel from sticking.
Another trick is to paint Scalex directly on the fired counter enamel surface. Use a soft brush to paint and cover the whole surface. Let the Scalex dry. Place the piece counter down directly on the rack and fire. The Scalex fires into the counter and keeps it from sticking to the rack. The scalex fired into the counter looks chalky, may have brushstrokes and may have cracks. This would only be done if you are not meant to see the back because it is ugly. You can fire the piece over and over because the coating stays fired into the counter.
There’s a couple of drawbacks. If you want or need to add more counter enamel to the piece, then the scalex needs to be removed. I grind off most of the fired Scalex coating with a stone. I may not grind it completely off but enough. Then you can sift on or paint on more counter enamel. The additional counter fired over it will mostly stick but will look very unslightly.
Another drawback, the current pale beige gray color Scalex sometimes becomes flakey on the back and comes off some. If it does this, I just brush off the excess and continue. If this happens usually enough of the Scalex has still fired a coating into the counter to keep it from sticking. The old formula Scalex (blue gray color) seems to stick without any flaking.Another product that I recently learned about from Tanya Crane is using thin compressed graphite sheets to fire on. The graphite sheet is used in the same way as a mica sheet. (Tanya Crane-TES talk on June 16, 2020.)
The graphite sheets come from McMaster-Carr. Item # 1276N12, The sheets are 1/16” thick and are 12”x 12”. (Recently it cost me $30.90 with the shipping added). You can cut the graphite with scissors to whatever size you want.
After firing the graphite will bubble up some in spots but I have ignored that. Sometimes the graphite may stick slightly to the counter enamel so the counter will end up looking ugly. The sheets can be re-used many times. I’m not sure but I think after awhile it may start to break down some. The only issue I have encountered is that the graphite is a somewhat slippery and smooth surface so be careful when placing the enamel in and out of the kiln, so it doesn’t slide off. I think this may be only an issue when you have a large piece that goes all the way to the edges of the graphite sheet.
A side note…Tanya mentioned that you can sift enamel on it and fire to make sheets of enamel. (I haven’t tried it yet).
Pin Setting, solderless, by Elizabeth White-Pultz
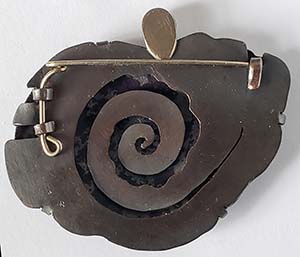
The Pandemic forced us to get creative with jewelry making when we didn't have access to a torch or other tools. I designed this setting to be completely solderless, although I did eventually add a stone setting. I used it to demo for a three-week on-line course I taught through 92nd St. Y [NYC]. I based it on a tab setting I learned in a workshop with Marissa Sainholtz during an Enamel Guild Northeast conference. I like the simplicity of this approach. I find it especially suitable to odd-shaped pieces. It also can have an elegant minimal feel which keeps the focus on the piece.
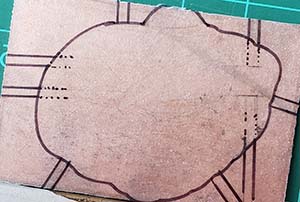
Basically I start by tracing the piece to be set on a piece of cardboard. This allows me to work out where tabs and pin mechanism should be. Once I work out these details I make a tracing of the design and rubber cement it to my metal, in this case copper. After sawing out the piece, filing and sanding, I adjust the tab/prong height. I then bend the pin stem holder and catch. Once trimmed and finished I set the piece. I then set the pin stem.
