
This chapter discusses all about grain and liquid enamel. The painting enamel information is in the Supplements and Add-Ons chapter. This page lists some infomation that did not make it into the book.
TOC
- Chemistry of Enamels - Soft, Medium and Hard Enamels and Viscosity And Expansion
- Clear Transparent over Copper
- Color Layering
- Crackle Bases - Thompson Unleaded
- Japanese Enamel Numbering Systems
- Low Acid Resistant Enamels
- Mesh Sizes
- Opalescent Enamels
- Opaque Haze - use an a semi-transparent
CLear Transparent enamel and How it Affects the color of copper - thompson Enamels
There are different clear transparent enamels (also called flux and transparent clear enamel). Each of the formulas, when fused to copper, affect the color of the metal. Some, like 2030 and 2008, cause the copper to look pinkish. But some make the copper look goldish. My favorites are 2015 Golden Clear and 2110 Wax Yellow (also called Ivory Beige). 2015 is less golden than 2110, but both are really nice. I'm sure all the other manufacuturers have differences, too, but these are the ones I know.
Color Layering
Page 21-22, About Colors, in the book describes much about the enamel color attriute of transparent, opaque and opalescent. It does mention layering and here is some more information...
 Remember that the enamelist can mix two close colors, say two transparent green, to produce a new color, but also consider that you can layer colors of non-close pigment to get a new color, too. For example, although you cannot mix blue and red grains to get a purple (the result will be dotty), if you fire a blue and then overlay it with a layer of red, you will get more of a purple.
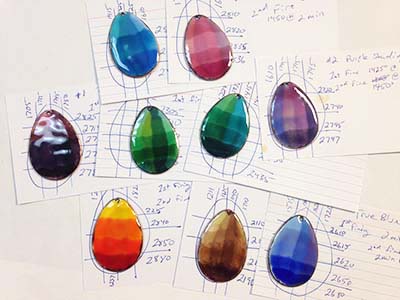
Pam East found that she really liked layering transparents over opaques and has a suggestion of test firing colors to see what you get; she wrote the article "Anatomy of an Enamel Test Block" in GOM June 2014 (Vol 33, No 3). In it she suggests layering a few opaques in verticle stips and firing. Then layering a few different transparents horizontally over them to see what shades you get. Her final test piece is shown to the right.
Crackle Bases - Thompson unleaded
There are three Thompson enamels currently called Crackle Bases - 1006 (White), 1997 (Black) and 2008 (clear). But the actual Crackle enamels are liquid and their name was changed from Crackle Enamels to Liquid Form Enamel colors, to reflect that they can be used for many more things. Here is some information about these enamels. Note that 1020, Titanium White, can also be used for a crackle base.
The ONLY time this line of Thompson Enamel liquids crack are when they are used over the bases (or 1020). If you put any other Thompson unleaded enamel over the bases, they normally produce a technique called Pull Through. It is incorrect and misleading to call this result crackle enamel instead of pull through. They look totally different - one has cracks like rivers and one has dots. Please do not call this Crackle Enamel.
 |
|
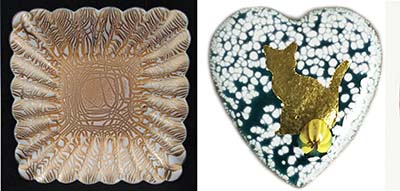
Crackle Enamel |
Pull Through By Karen L. Cohen |
Low Acid Resistant Enamels
These enamels do not like being in even mild acids such as Jewelry Pickle. They will turn matte and at least sometimes never return to be glossy, even after firing again. Although you probably don't want this to happen, there are times when it could look rather nice as in this piece by Jennifer Bauser, shown in the book on page 45 about layering gold leaf. Jennifer had put the blue in pickle after some soldering and it got all funky and pitted and matte which she totally loved the contrast with the shinny gold leaf so continued to use the piece. The enamel was 1698 Darkest Blue by Thompson Enamels.
Mesh Sizes
This topic is covered extensively in the book, but there is always more to learn. Ora Kuller uses the fact that wet-pack grains straight from the jar will spread when fired. But if you want a wet-packed application to stay where put, use -200 or smaller mesh. Remember, though, that if this is a transparent, it may be more opaque than you want so there is a trade off. Experiement and see what works for you. Also, remember that the higher/longer you fire, the more spread you could get.
Chemistry of Enamels - Soft, Medium and Hard Enamels
Without any knowledge of the chemistry of enamels, one can create quite a lot. But problems might happen and without some knowledge, it would be difficult to troubleshoot. Also, knowledge of the chemistry is helpful when choosing a mixture of enamels to use in a piece. I consider this one of the most important aspects of enamel education and yet many teachers don't mention it. The book, on page 20, mentions soft, medium and hard enamels saying this:
Some enamels fuse faster than other enamels, even within the same manufacturer. These are known as soft, medium, and hard fusing. (also known as low firing, medium firing and high firing, referring to their firing temperatures). This is dependent on the enamel's fusion flow and softening temperatures. A soft enamel will fuse first and a hard enamel last. Thus, it is important to know this characteristic about the enamels you are using. Soft-fusing flux may be added to harder colors to reduce their firing time, or a color may be grade-sifted to a finer particle size, which will fuse faster. When mixing hard and soft colors in the same piece, fire the harder colors early, leaving the softer colors until the end. In general, harder enamels should be fired under softer ones. When unsure if a color is hard, medium, or soft, test-fire it along with a color whose hardness is known or refer to the manufactuer's specifications. Keep notes on the findings. See Photo 56. The project: "Sgraffito – Liquid Enamel with Layered Wet-Floating" discusses using hard flux as a way to allow the use of seemingly incompatible enamels to be fired together.
That information is only the tip of the iceberg. Below is more information. Unfortunately, there is no hard and fast rule and the information can be confusing. I will add more explaination as I come across it or am able to articulate it better. The practical use of this information can be given in particular situations and I will add some of these as I can, at the end of this discussion. If you have more info on this topic, please do contact me to discuss. The information below was accumulated through talks with Tom Ellis, Cullen Hackler, Barbara Minor and Judy Stone.
Note: since 2020 COVid kept us all home and away from classes, a new benefit of The Enamelist Society is our zoom meetings. Each week someone else makes a presentation and starting in 2021 these are every other week with the off week being a repeat of one of the previous lectures. These have been most illuminating and I have added to this site information I have learned during these times (I even gave one!). Anyway, on Februrary 2, 2021, the topic was this information on the chemistry of enamels. This is well worth viewing and a good reason to become a member (only members have access to zooms).
Overview and definitions:
There are three main characteristics of enamels: fusion flow, softening point (temperature) and expansion. For Thompson Enamel enamels, the values for these are listed in the The Thompson Workbook, a publication I recommend to anyone who uses TE unleaded enamels (for the leaded enamels, see Glass On Metal magazine - Vol. 3, No. 5, October 1984, pages 64 & 65). For other manufacturer's, ask your supplier. Here are the values for Schauer Transparents and Schauer Opaques
GOM states: "When using the charts remember these numbers are relative terms for their own sake and do not include other such factors which relate to the specific, i.e. particle size, rate of fire, method of applications, etc." Confused yet? Plug ahead...
Fusion Flow: how qickly the enamel flows at a given temperature and set timing.
Fusion flow indicates how easily the enamel will flow when it softens. This is in reciprocal relationhsip to an enamel's vicosity where viscosity is the thickness of the enamel when it flows. ie: the greater the viscosity (the thicker), the less the enamel will flow.
The fusion flow number was obtained in an interesting way. Tom Ellis related that a small pill sized piece of fused enamel is fused to a steel plate. Then the steel is set in a kiln at a certain temperature, say 1450°F, in a verticle position, for a standard period of time. The amount of dripping/flow the enamel causes on the plate is used to determine the fusion flow number.
Barbara Minor explains viscosity like this: "The viscosity of a fluid is a measure of its resistance to deformation at a given rate. For liquids, it corresponds to the informal concept of "thickness": for example, syrup has a higher viscosity than water. (from Wikipedia) So, it's not only the "thickness" but also the "resistance" to flowing. I explain it as a higher fusion flow has a harder/takes a long time smoothing out during the firing process". (editors note: this is an important concept to remember as it affects how your enameling will progress).
Softening Point: the temperature when the enamel starts to move.
Normally, but not always, a low softening point and a high (long) fusion flow makes an enamel a softer enamel (does not mean soft fusion flow). Conversely, but not always, a high softening temperature and a low(short) fusion flow makes a harder enamel. It is frustrating that this is not always true so the tables do not give the enamelist a definitive tag for each enamel - only testing will reveal what is soft, medium or hard, and these tems are only relevant in relationship to each other. But what is clear is that using them in a manner inconsistent with their characteristics will cause problems - see the Practical Use section below.
As an example - you can see that the "soft" enamel does have the highest fusion flow, but not the lowest softening point.
| Name | Fusion Flow | Softening Point |
| 426 Soft Fusing Flux | 113 | 851°F |
| 1005 Medium Fusing Flux | 103 | 833°F |
| 333 Hard Fusing Flux | 50 | 914°F |
A fast and simple (but not totally accurate) way to determine soft/medium/hard is by looking at the Softening Point. Try this but keep notes and if it doesn't seem to work then check the Fusion Flow numbers. Keep Records!!!
Expansion (COE): is how much the enamel expands when heated and contracts when cools - the higher (faster rate) the expansion, the bigger it gets when heated and the more it contracts (goes back to where it started) when cooled.
Metal also has an expansion and the expansion of the enamel and the metal must be compatible for the enamel to stay on the metal. That is a primary reason why Thompson Enamel sells different lines of enamel (more information is given the GOM issue: Vol2 No2 June 1983).
In general, use higher expansion enamels under lower expansion enamels.
Layering the opposite way (lower under higher) will probably cause Pull-through because when cooling, the higher expansion contracts faster than the lower expansion and thus gives time for the lower expansion on the bottom layer to move up into the upper layer.
Note: the unleaded Thompson enamels are higher expansion than the vintage leaded Thompson Enamels. The rule is UNleaded UNder leaded (for TE enamels) or in other words - higher expansion under lower expansion.
Keep in mind that glass COE numbers are linear expansion numbers and enamels are cubic expansion (ie: 3 times the linear). Thus if a glass has a COE of 90, the enamel compatible COE is 270.
In practical terms - avoid using enamels together that have wide expansion differences and use enamels formulated for the metal you are using as a base.
Practical use of this information:
Here are some practical applications of the use of this information. Tom Ellis reminds us..." When talking about the physical science as it relates to ones own enamel work and how that scientific knowledge has the potential for the enameler to understand and improve their work , it must be pointed out that ‘enameling ability’ is also crucial to making sense of what is happening. ‘Enameling ability’ would be the ability to apply repeating even consistent applications and application thicknesses of enamel as well as control over the firing temperature and time. If there is no consistency to application of enamel and firing, the science may not appear to make any sense to your results. The operator is very important in this equation of science, materials and procedure".
- Vertical objects / effects of gravity: enameling on any object with a steep slope, or a flat object placed on a trivet on an angle (ie: not flat) will be affected by gravity. Thus be aware and careful when using an enamel with a high fusion flow in these situations. Here are examples...
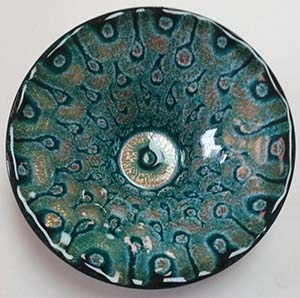
- bowls - if you using a high fusion flow enamel on a bowl, because of the flow and the steepness of the curved surface, the enamel will slide towards the middle. Thus it's better to use a low fusion flow enamel on a steep bowl. But Tom points out: "... you could use an enamel with a high fusion flow, have it slide to the center, then on another firing turn the bowl upside down and let the enamel slide to the outer rim – you may get a great result. Again, operator ability is so important to everything."
- In general, it's not a big deal if you place your piece on a trivet and it's not exactly flat (horizontal). However, if you are high firing, such with the last firing of the High Firing Webbing Technique (an LTT on page 100 by Trish White who started Grains of Glass site for enamelists), which requires a set of enamels that produce Pull-through as a base, then the slope of the piece on the trivet will cause the enamel to "run" towards the lower edge. You might like this effect and that's fine, just be aware that this will probaby occur.
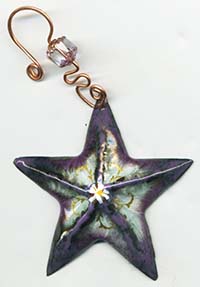 You can actually use this to your advantage. On a score and fold star, if you want to use the High Fire Webbing Technique, you will find that during the high firing the enamel will pool at the base, making a mess. But if you only keep the base on the top part, then during the high firing the enamel will "run" down the steepness to give you the look over more of the piece as in this star:
- Scrolling: this technique, listed as an LTT on page 49 of the book, uses lumps and possibly threads at a high firing (1650°F) to "marble" the enamel. I used to teach at an art camp for kids during the summer and we loved using this as one of the enameling projects. One day a camper used TE 1020 Titanium White as the base for the scrolling and while doing the marbling step it looked fine in the kiln and the colored lumps were nicely marbled. After that we let the enamel "rest" in a closed kiln before removing it to see the masterpiece. But when it came out of the kiln, the entire peice was solid white. I was totally dumbfounded! It took me three days of thinking about this, already knowing about soft medium and hard enamels, to figure out that 1020 must be really soft and thus during the resting phase bubbled up over the colors of the lumps. From then on we used 1020 as a base for Pull-through with much delight and I noted on the jar to NOT EVER use it for a base for scrolling!
- Minimize Pull-through: Pull-through is normally caused because the bottom layer of enamel fuses before the top layer and while the top is not yet flowing, the bottom layer bubbles up into the top layer, surrounding some of the grains and thus you get a speckled look. This occurs during the heating stage. Note: in the Expansion (COE) section above a form of Pull-through is discussed that is caused during the cooling stage.
However, finer particles of enamel fuse faster (because they are small) than the full 80 mesh out of the purchased jar. Thus Tom Ellis uses a finer mesh for a top coat which minimizes the chance for Pull-through. Tom, Cullen and I think the reason this minimizes Pull-through is for two reasons... 1) because the top layer (now smaller particles) fuse faster so the bottom doesn't have a chance to bubble up and 2) because the smaller particles have less space between them so there is not as much room for the bottom layer to bubble up. These might also be affected by the viscosity of the bottom layer. One can see how confusing this all is and how there is no hard and fast rule. But by being aware of this you can try to achieve the look you want with enamels.
Judy Stone uses a hard flux to cover her mixture of enamel types, in a light coat, to "even" out the layer and minimize Pull-through - see her project in the book on "Sgraffito – Liquid Enamel with Layered Wet-Floating." She says: "There are other fluxes that give a similar result to what I get with my Blythe C-10, which could be somewhat categorized as hard fusing, but the variable here is viscosity. One of my goals is to keep my lines from splatting which happens with certain “softer” fluxes and to make sure the layer that I am covering with flux doesn’t break through the flux. Underfiring is also a factor for the flux. " - Cracking: if you piece continues to crack even after trying the addition of more counter enamel, the problem might be due to the expansion of the metal and the enamel during cooling. Try this: Instead of removing the piece after it is fully fired, cool it down slowly by turning the kiln off, fanning the door a bit to reduce the temperature, then close the door and leave it in the kiln overnight.
- Separation Enamel: this project in the book, on page 245 by Tom Ellis, gives the lesson on how to use this special supplement to make layers of enamels separate into interesting designs. The enamels that are used, though, have an affect on what you get. In general, this technique uses a clear base with a 2nd layer of a light opaque an a third layer of a dark transparent, each fired individually and then the Separation Enamel added and fired on a 4th firing. Here is an example from Tom and an explaination of the results:
2nd layer of 1045 white with Fusion Flow of 14.
Note that the white has a defined edge as 1045 has a very low fusion flow number.2nd layer of 1030 white with Fusion Flow of 47.
Note that the white has a feathered edge as it has a medium fusion flow number.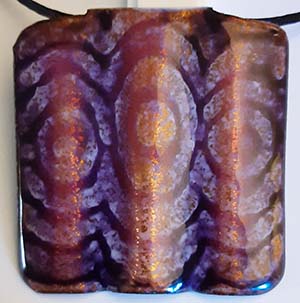
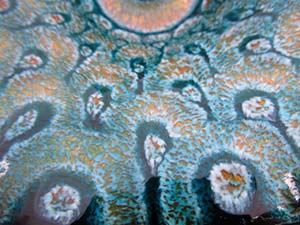
detail of full view below
Opalescent Enamels
Not all enamels called opalescent are true opalescents. Patsy Croft explains what she learned from Merry-Lee Rae and Woody Carpenter. Opalescents need to be fired at certain temperatues otherwise they turn opaque. Merry-Lee teaches a class on opalescents.
Opaque Haze
 Opaques, of course, are enamels that are solid and cannot be seen through. However, some can go transparent if over-fired. And the "fines" of opaques are not as opaque as their larger grains. But...
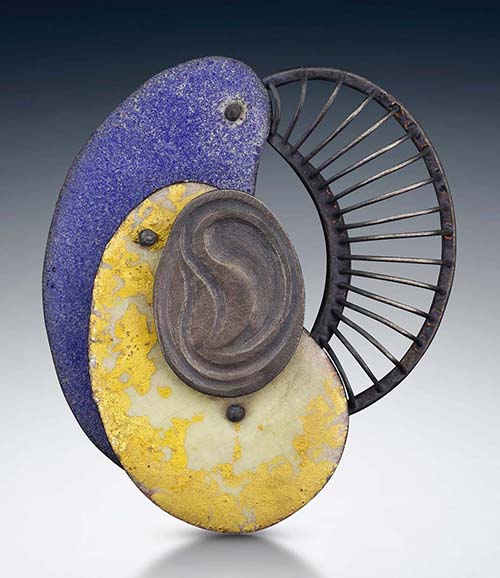
Kathleen Wilcox likes to use an opaque in a less than typical way. When the opaque is sifted lightly you can see through the enamel so that it appears that you are looking through a haze of color. It creates an effect somewhere between opaque and transparent. Opaque haze, my term for it, is done over a pre-fired enamel surface. I sift usually using a 100 mesh sifter (and sometimes a 150 or 200 mesh sifter). I use the opaque straight out of the jar. I sift lightly so I can still see whatever the image is underneath. It is then fired to gloss which may fire quicker because it has been applied thin. See the detail of the piece to the right where the center "square" was created sifting opaque enamel in this way.
Japanese Enamel Numbering Systems
There are three Japanese enamel companies. Here is a link to figure out their numbering systems.